Want to learn how to code in HTML for WordPress?
Knowing HTML will help you a lot when it comes to building and maintaining your WordPress website.
Otherwise, you might have to pay someone just to make minor changes to your site.
But the problem is that most people do not have time to learn to code.
Well, that’s where this WordPress HTML tutorial comes in.
You won’t learn all of HTML, but it will go over some of the basics as well as the HTML elements that will be very handy for your site.
Even if you don’t learn HTML completely, it’s still highly useful even if you only understand a little about how it works.
Table of Contents
- What is HTML?
- What is an HTML Element?
- HTML on the Surface
- HTML Elements Can Be Nested
- HTML Page Structure
- Semantic vs Non-Semantic Elements
- HTML Attributes
- Viewing the HTML of a Webpage
- HTML Classes & Ids
- HTML Class Attribute
- HTML ID Attribute
- HTML Style Attribute
- Common HTML Tags for WordPress
What is HTML?
W3schools describes this well:
- HTML stands for Hyper Text Markup Language
- HTML is the standard markup language for creating webpages
- HTML describes the structure of a webpage
- HTML consists of a series of elements
- HTML elements are the building blocks of a webpage
- HTML elements tell your web browser how to display the content
- HTML elements label pieces of content such as “this is a heading”, “this is a paragraph”, “this is a link”, etc.
What is an HTML Element?
The structure of an HTML element consists of a start tag, some content, and then an end tag.
<start tag>some content</end tag>
For example:
<h1>My great site title</h1>
<p>this is a paragraph</p>
<p>this is another paragraph</p>
<b>this text will be bolded</b>
I’m sure you can see the pattern now for the structure of HTML elements.
<some term>some content</repeat term>
However, not all HTML elements will have the end tag.
For example:
<br>
This element stands for “line break”; it’s an empty element where no content is sandwiched between it.
This is because it simply creates a single line break in text.
HTML on the Surface
On the surface, your web browser does not display the HTML tags, but uses them to determine how to display the document.
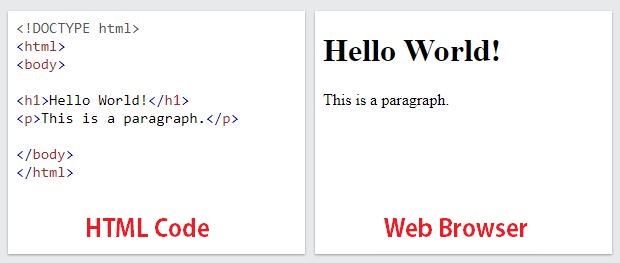
On the left, is the HTML code; on the right, is how it is displayed when viewing in a web browser.
Here’s another example if adding more paragraphs elements and a line break element.
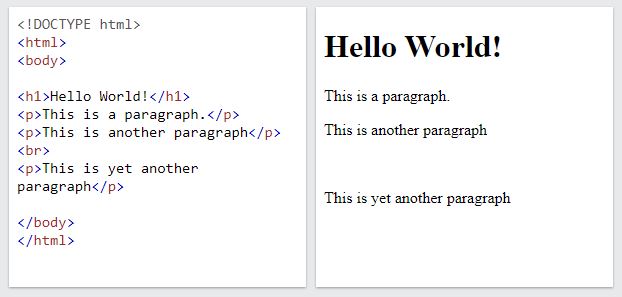
As you can see from both examples, only the content inside of the tags are displayed in a web browser.
HTML Elements Can Be Nested
HTML elements can be inside other HTML elements.
Nesting HTML elements forms a hierarchy.
<html>
  <body>
    <h1>Hello World!</h1>
    <p>This is a paragraph</p>
  </body>
</html>
As you can see from this HTML code:
- Paragraph and h1 elements are inside the body element
- Body element is inside the html element
HTML Page Structure
This is a visual representation of how a webpage’s HTML can be structured.
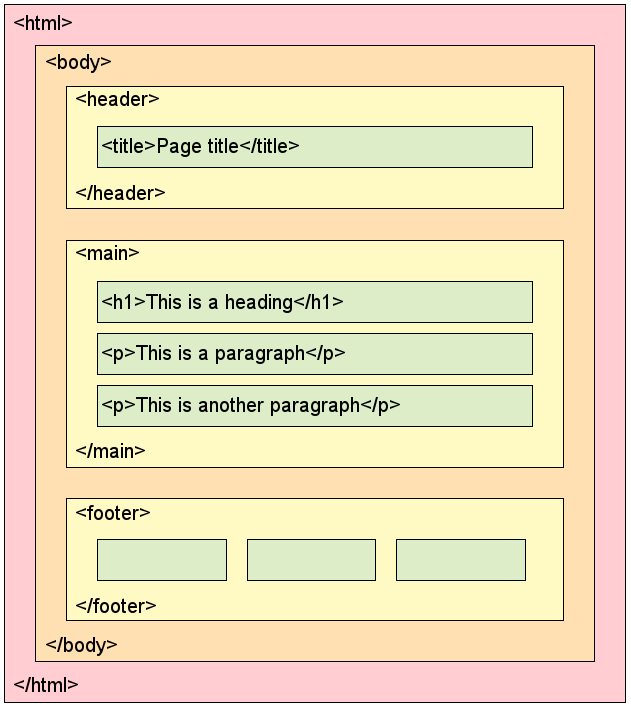
As you can see, the <html> element is the root element; it defines the whole webpage.
It consists of an <html> start tag and an </html> end tag.
<html>
</html>
Inside of the <html> element is the <body> element.
The <body> element consists of a <body> start tag and a </body> end tag.
<html>
  <body></body>
</html>
Inside of the <body> element is the <header> element, the <main> element, and the <footer> element.
The <header> element consists of a <header> start tag and a </header> end tag
The main element consists of a <main> start tag and a </main> end tag.
The footer element consists of a <footer> start tag and a </footer> end tag.
<html>
  <body>
    <header></header>
    <main></main>
    <footer></footer>
  </body>
</html>
Inside of the <header> element is the <title> element.
Since <title> element defines the webpage’s title, some text of our choosing is sandwiched between it.
<html>
  <body>
    <header>
      <title>Page title</title>
    </header>
    <main></main>
    <footer></footer>
  </body>
</html>
Within the <main> element, we have the <h1> element and two <p> elements.
<html>
  <body>
    <header>
      <title>Page title</title>
    </header>
    <main>
      <h1>This is a heading.</h1>
      <p>This is a paragraph.</p>
      <p>This is another paragraph.</p>
    </main>
    <footer></footer>
  </body>
</html>
For your actual WordPress site, elements are likely to be more nested than this representation.
For example, on AsapWP, for the webpage of any post, the path to a single paragraph element in an article is:
<html>
  <body>
    <main>
      <article>
        <div class="post-inner">
          <div class="entry-content">
            <p>This is a paragraph</p>
          </div>
        </div>
      </article>
    </main>
  </body>
</html>
The concept is still the same here, there are just more nested elements.
Semantic vs Non-Semantic Elements
Semantic elements describe themselves and their content.
These are HTML elements like <header>, <nav>, <main>, <article>,<section>, <footer>, etc.
Conversely, non-semantic HTML elements like <div> and <span> tell you nothing about what they’re about.
When viewing the HTML of a webpage, the use of semantic elements helps you understand what that particular portion of content is about.
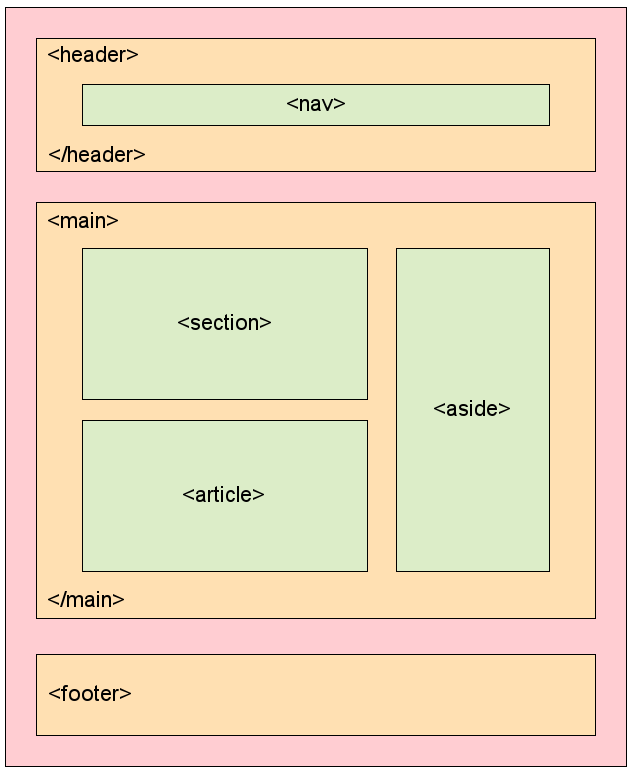
In the previous section, I included the HTML structure to a paragraph:
<html>
  <body>
    <main>
      <article>
        <div class="post-inner">
          <div class="entry-content">
            <p>This is a paragraph</p>
          </div>
        </div>
      </article>
    </main>
  </body>
</html>
Just from the names of the nested semantic HTML elements, you can tell a lot about where the <p> tag is and what it is about.
The <p> tag is contained:
- Within the webpage’s body (<body> tag)
- Within the main content of the webpage (<main> tag)
- Within a self-contained piece of content (<article> tag)
- Within the inner portion of the article/post (<div class=”post-inner”>)
- Within the entry content (div class=”entry-content”>)
In this case, the <p> tag is part of the page’s main content within an article/post.
Below is a list of some semantic HTML elements and their descriptions:
- <head> contains metadata/information for the webpage
- <header> specifies a header for a webpage or section
- <nav> defines navigation links
- <aside> defines content aside from the content (e.g. a sidebar)
- <body> defines the webpage’s body
- <main> specifies the main content of a webpage
- <section> defines a section in a webpage
- <article> defines self-contained content
- <footer> defines a footer for a webpage or section
HTML Attributes
HTML attributes provide additional information about HTML elements.
- All HTML elements can have attributes
- Attributes provide additional information about elements
- Attributes are specified in the start tag
- The format for attributes is usually: name=”value”
href Attribute
Let’s say you wanted to create a hyperlink (a link) to any webpage.
The <a> tag defines a hyperlink.
However, it requires the addition of an HTML attribute in its start tag to specify the URL, which is where the link will take you to.
The attribute is href=”URL”
So, the HTML code to create a hyperlink is:
<a href=”https://WebsiteAddress.com”>text of the link</a>
If I wanted to create a hyperlink to https://asapwp.com it would be:
<a href=”https://asapwp.com”>AsapWP</a>
Which would produce this link:
Src Attribute
The <img> tag allows you to embed an image into your webpage.
However, it also requires an attribute in its start tag, which specifies the URL address of the image to use.
The attribute is src=”URL”
So, the HTML code to embed an image is:
<img src=”https://WebsiteAddress.com/the-image-address”>
Note: Like <br> (line break) tag, the <image> tag is empty and does not have an end tag.
If I wanted to embed an image of a bulldog that I have on my server to this article, it would be:
<img src=”https://asapwp.com/wp-content/uploads/2022/12/bulldog_640.jpg”>
Which would produce this embedded image:

HTML elements can contain multiple attributes.
For example, within the <img> start tag, you can add attributes to specify the desired width and height of an image (in pixels) to embed.
- The width attribute is width=”250″ (change to your desired pixels)
- The height attribute is height=”225″ (change to your desired pixels)
So, the HTML code to embed an image with a specified width and height is:
<img src=”URL” width=”250″ height=“225”>
For the bulldog image again, it would be:
<img src="https://asapwp.com/wp-content/uploads/2022/12/bulldog_640.jpg" width="250" height="225">
Which would produce the embedded image with the new dimensions:

Viewing the HTML of a Webpage
It’s easier to learn HTML by seeing it in action.
To inspect any webpage, simply right-click on it with your mouse and click “Inspect Element”.
In the “Elements” tab, you’ll see all the HTML code.
For example, if I inspect this post’s webpage, you can see the HTML that comprises it:
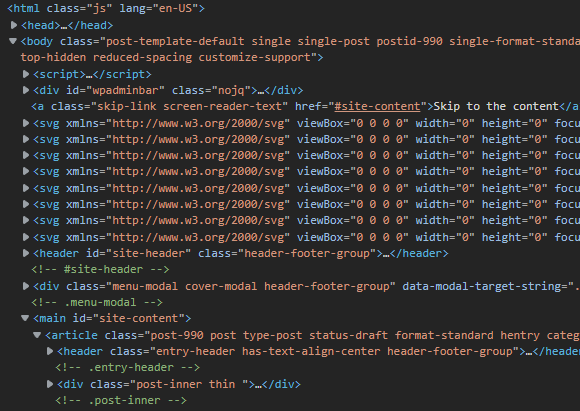
This looks messy because there is a lot going on.
But we can reduce it to the page’s main, top-level elements.
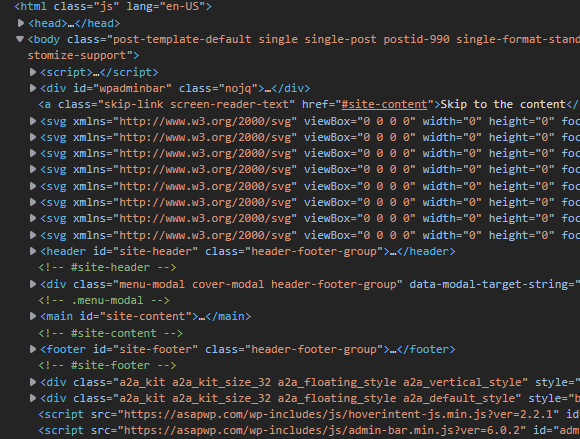
For example, if we collapse the <body> element by pressing the arrow next to it, we can see all the nested elements inside of it disappear.

Just like the visual representation from before, we’re left with the basic, top-level elements that help to build the page.
The <html> element is at the top, and inside it are the <head> and <body> elements.
Note: the <head> is different from the previous mentioned <header>; the <head> stores metadata for the webpage.
Let’s say you wanted to manually find this particular sentence in the HTML code.
First, you’d expand the <body> element, because it comprises everything you see on the webpage.
Next, hover your mouse over each HTML element inside of the <body> element.
As you do, it will highlight the HTML element on the actual webpage in real-time.
From this, you can find which element is responsible for what part of your webpage.
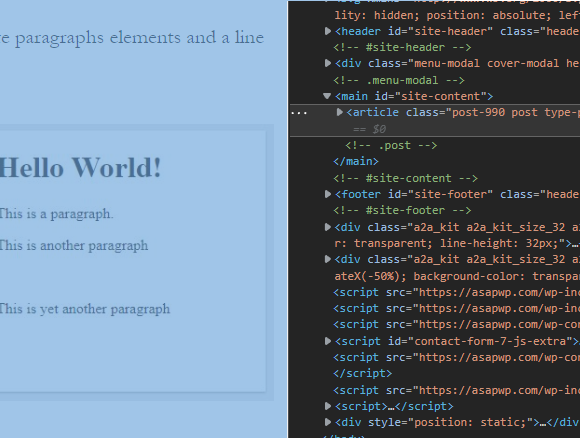
As I do this, I can see that when I get to the <main> element, it highlights my blog article.
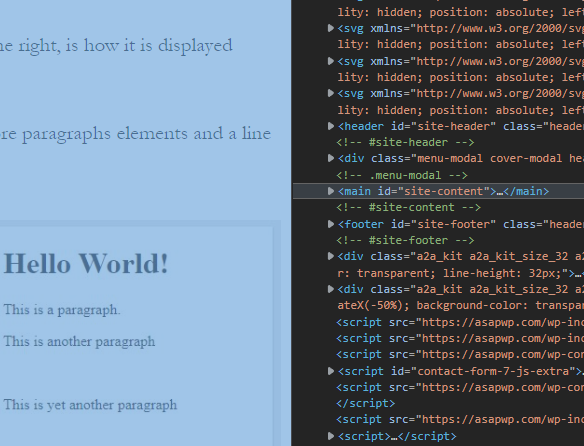
Digging deeper, within the <main> element, the next element to highlight the article on hover is the <article> element.
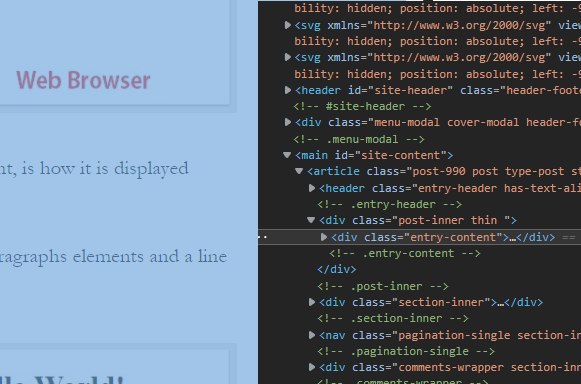
Within the <article> element, the element <div class=”post-inner thin”> again highlights the article.
Continuing deeper, within <div class=”post-inner thin”>, the <div class=”entry-content”> element highlights the article.
As I open <div class=”entry-content”> I can see individual paragraph elements.
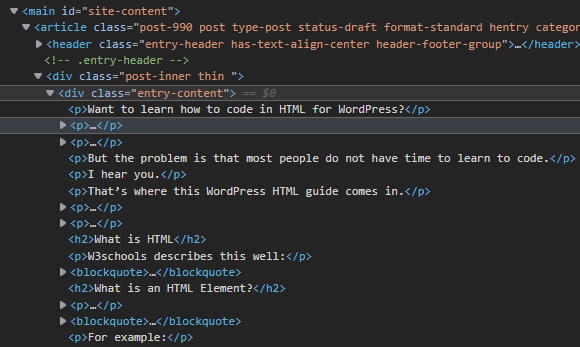
This means the <div class=”entry-content”> is the last element that contain the entirety of the article.
Within it, we’re now getting into the individual elements that comprise the article itself, such as the <p> tags and <h2> tags.
In order to locate that particular sentence I previously mentioned, you could hover over each <p> tag until you find it.
As you can see from the image below, I’ve located the <p> tag responsible for the sentence.
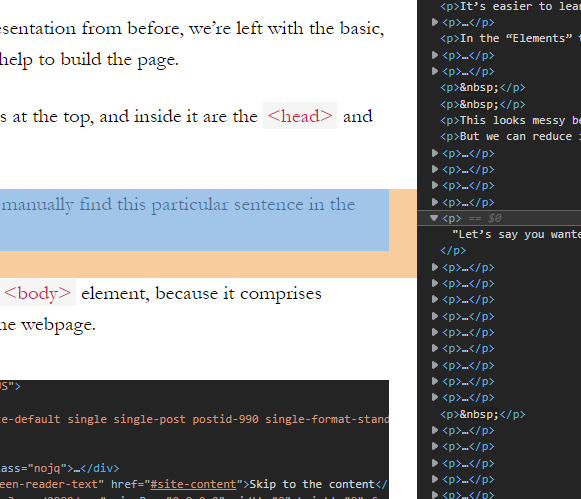
The point of this exercise is to help familiarize yourself with inspecting the individual HTML elements of your webpages.
It also helps you to see how the elements are arranged hierarchically.
Being able to see how the HTML makes up your webpage is important to understanding HTML.
And knowing how to locate specific elements that you might want to target later with CSS styling will be extremely useful.
Locating Particular HTML Elements Faster
The process we just went over to find a particular HTML element on a webpage was tedious; however, there is a more practical way:
In the future, simply right-click any element on the webpage itself (you don’t have to highlight it) and click “Inspect/Inspect Element”.
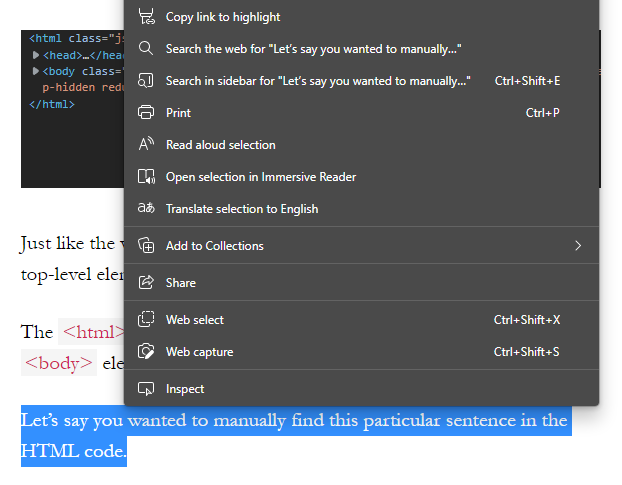 What will happen is the web browser will immediately open the HTML inspector and highlight the matching element for you.
This avoids the process of having to manually go through all of the parent elements and locate it as previously described.

HTML Classes & Ids
If you noticed from the images of this site’s HTML code above, many of the elements have the terms “class” and “id” in their start tags.
For example:
<body class=”some-term“>
<main id=”some-term“>
<div class=”some-term“>
<div id=”some-term“>
This is different from the way you’ve previously seen these tags as:
<body>
<main>
<div>
As you have probably figured out, these are more of those HTML attributes we previously discussed.
HTML Class Attribute
The HTML class attribute specifies a particular class for an HTML element.
Different HTML elements can share the same class.
To add a class attribute to an HTML element, you add class=”some-term” in the start tag of the element.
For example, to add a class attribute to a <div> tag:
<div class=”country”></div>
<div class=”banner”></div>
If you are creating a new class, you can name it whatever you want (e.g. country, banner, dog, etc).
Class attributes are very useful because by assigning a unique class name, you differentiate the element from other versions of itself.
Then, with CSS code, you can manipulate and style that specific HTML element.
By having a class attribute in the HTML element, it allows you target only the elements containing that class, excluding the rest.
For example:
<div>This is div number 1.</div>
<div>This is div number 2.</div>
<div>This is div number 3.</div>
With only this code given, there is no way for me to target only div number 2 (or any of the others separately)
Because without a class attribute, all of these elements are simply generic <div> tags.
In CSS, the format to style them would be.
div {
  color: red;
}
And it would apply that styling to all of them. However, if I were to give them each their own unique class:
<div class=”one”>This is div number 1.</div>
<div class=”two”>This is div number 2.</div>
<div class=”three”>This is div number 3.</div>
Now when I go to style these in CSS, I can target them individually.
For example, to target only div number 2, I simply target its class name:
.two {
  color: red;
}
Note: notice the prefix “.” before the class name; this is required for targeting class attribute in CSS.
By targeting the class name, I only affect those HTML elements with that particular class.
This same logic applies to other elements besides div tags.
For example, the <span> element: <span class=”fancy”>
To target it in CSS would be:
.fancy {
  color: blue;
}
Some extra points for class attributes to keep in mind:
- Class names are case sensitive
- Class attribute can be used on any HTML element
- Different HTML elements can share the same class name (e.g. a <div> and <span> tag can both have the same class name)
- A single HTML element can contain multiple class names, created by having a space between terms (e.g. <div class=”country canada”> now contains both class names “country” and “canada”)
- If you want to create a class with only one class name but have it contain multiple words, join the words with a hyphen (e.g. <div class=”country-canada”> is now one class name)
- Class attribute can also be used by Javascript to target HTML elements
HTML ID Attribute
The HTML id attribute specifies a particular id for an HTML element.
Unlike class attribute, you cannot have more than one element with the same id within the same webpage.
Like with classes, the id name allows you to differentiate and target specific HTML elements from others with CSS.
To add an id attribute to an HTML element, you add id=”some-term” in the start tag of the element.
For example, to add an id attribute to a <div> tag:
<div id=”country”></div>
<div id=”banner”></div>
You can name the id whatever you want (e.g. country, banner, dog, etc).
To target a specific id with CSS, you use a “#” as a prefix to the id name.
For example, to style <div id=”country”> in CSS would be:
#country {
  color: red;
}
HTML Style Attribute
The HTML style attribute allows you to add styles to an element. This can include font, color, size, spacing, etc.
To add a style attribute to an HTML element, you add style=”property:value;” in the start tag of the element.
The “property” is a CSS property; the “value” is a CSS value.
For example, to add a style attribute to a <p> tag:
<p style=”font-size:150%;”>This is larger font</p>
Which would look like:
This is larger font
You can apply the style to many other HTML elements, such as <div>, <span>, <h1>, etc; for example:
<span style=”color:red;”></span>
You can add multiple style attributes to a single HTML element; for example:
<span style=”color:red; text-decoration:underline; background-color:green; font-size:200%;”>There is a lot of styling for this text</span>
There is a lot of styling for this text
The HTML style attribute makes use of CSS code. Generally, you will style your HTML elements with CSS code from your themes CSS stylesheet.
Alternatively, you can use the Theme Customizer under the WP admin side panel: Appearance->Customize.
Although there will be times when you might want to add small bits of CSS to a non-recurring/single HTML element on your site.
In this case, you could use the style attribute for the HTML element instead of adding CSS to your stylesheet.
Don’t worry too much about the style attribute for now, because it requires that you know some CSS.
Common HTML Tags for WordPress
WordPress users have an advantage being that you don’t have to code your website from the ground up.
Your theme will have already been built with HTML.
So, you generally won’t be using the HTML tags that make up the main structure of the webpage, such as:
<header>

  <nav

<body>

  <main>

    <article>

  <footer>
Instead, you’re likely going to be adding HTML inside of these elements.
You will do this naturally when you create your blog posts, product pages, or footer widgets.
With that said, here are some common HTML elements you might use in WordPress:
Div Elements
One of the most useful elements for use on your WordPress website.
A <div> defines a section on your webpage, and it’s used to create a new container for HTML elements to go inside it.
You can easily assign a class or id attribute to a <div> tag to differentiate it from other elements.
Then, the <div> tag can easily be styled and manipulated with CSS.
The format is:
<div></div>
A <div> element will start on a new line, with a line break before and after it.
Additionally, by default a <div> element will always stretch out left and right as far as it can, taking up the full available width.
Therefore, a <div> element is known as a “block-level element”.
For example:
<div>some text</div><div>some text</div>
Each div will occur on its own line; for example, the above code will produce:
Both of those “some text” are inside their own <div> container.
While you can’t see the div containers themselves, here is what they would look like:
As you can see, the containers naturally take up the full width of the available space; in this case, the blog post’s content container.
To assign a class attribute to a <div> element:
<div class=”someclass”></div>
To assign an id attribute:
<div id=”someid”></div>
You can create a <div> element when you want to define a new section in your webpage.
You can then put other HTML elements inside of this <div> container, such as paragraph text, images, etc.
From here, you can more easily style either the div container itself and/or the HTML contents within it.
For example, let’s say you wanted to have some text on a blue background.
You could put your text inside a div container and then style the container blue.
First, you’d create a new div and give it a class or id attribute.
<div class=”new-section”></div>
Add your text:
<div class=”new-section”><p>This is some paragraph text I want inside my div container</p></div>
With CSS, you could then style the div container by targeting its class:
.new-section {
  background-color: lightblue;
}
The result:
But you can do a lot more with <div> elements than just filling them with blue background.
You know those fancy page builders for WordPress that allow you to divide your webpage into sections:

What they are actually doing is nesting a lot of div containers inside each other, with HTML elements inside them, and then styling them.
Below is a sort of miniature representation of the image above, which I made entirely of nested div elements and some CSS styling.
This is some text for this heading section of my webpage
First Feature
Second Feature
Third Feature
Fourth Feature
Span Elements
Much like a <div> tag, a <span> element defines a section in a webpage.
The format is:
<span></span>
You can easily assign a class or id attribute to a <span> tag to differentiate it from other elements.
For example:
<span class=”some-class”></span>
Unlike a <div> element, a <span> element is an “inline-level element”.
This means it does not start on a new line.
Additionally, it only takes up as much width as is necessary for the element itself.
For example:
some text some text
Both of those “some text” are inside their own <span> container.
While you can’t see the span containers themselves, here is what they would look like:
some text some text
As you can see, <span> elements do not force a new line for themselves and only take up as much space as needed.
<span> elements are good for applying styling to parts of text within a sentence, because it won’t disturb the flow.
For example:
This word is wrapped in a <span> tag, while the rest of the words in this sentence are not; except for this this one.
On the other hand, if I was to take this exact same sentence but use <div> tags instead of <span> tags:
This
is wrapped in a <div> tag, while the rest of the words in this sentence are not; except for this this
.
The nature of <div> tags taking up a new line and expanding themselves fully, makes this a job for <span> tags.
Heading elements
Heading elements are defined with the <h1> to <h6> tags.
<h1> defines the most important heading; <h6> defines the least important heading.
<h1>This is a heading 1.</h1>
<h2>This is a heading 2.</h2>
<h3>This is a heading 3.</h3>
<h4>This is a heading 4.</h4>
<h5>This is a heading 5.</h5>
<h6>This is a heading 6.</h6>
Heading 1
Heading 2
Heading 3
Heading 4
Heading 5
Heading 6
These elements are used all of the time in WordPress for headings in your posts and pages for content organization and hierarchy.
WordPress creates these for you when selecting the heading type “Heading 1”, “Heading 2”, etc from within post editor.
As a rule of thumb, you would use only one h1 element per webpage.
Usually, your theme will automatically use an h1 element for the page’s title.
Paragraph Elements
A <p> element defines a paragraph.
A paragraph will always start on a new line (it’s a block-level element), and is usually used on text.
<p>This is a paragraph</p>
In WordPress’ post editor, when you press enter on your keyboard and begin typing on a new line, a <p> element is automatically created.
Browsers will naturally add white space (a margin) above and below each paragraph.
On your WordPress site, with CSS, you can adjust this margin if you want a larger or smaller gap between paragraphs.
Line Break Elements
The <br> element defines a line break.
A line break will start on a new line without starting a new paragraph.
<p>This is a paragraph with a <br>line break</p>
And here is how it would actually look:
This is a paragraph with a
line break
The <br> element is an empty tag, so it has no end tag.
Links
As previously mentioned, the <a> tag defines a hyperlink.
<a href=”URL”>Link Text</a>
For example:
<a href=”https://google.com/”>Google</a>
href attribute is the destination URL when a user clicks the link.
“Link Text” is what the user sees.
Target Blank Attribute
If you want the hyperlink to open the destination URL in a new browser window or tab:
target=”_blank”
For example:
<a href=”https://google.com/” target=”_blank”>Google</a>
Link Titles
If you want your link to display some text (tooltip text) when mousing over it.
title=”Some text”
For example:
<a href=”https://google.com/” title=“Google Search Engine”>Google</a>
Bookmark/Jump Links
If your content is very long, you can create clickable jump links to send a user to a specific portion of the content.
This can be great for creating your own table of contents in your posts/pages.
First, assign an id attribute to the element you want to jump to:
<h2 id=”some-heading”>Some Heading in my Post to Jump To</h2>
Next, add a link that will send you there:
<a href=”#some-heading”>Jump to the H2 Heading</a>
Here’s a jump link I made to the “Links” heading <h4> element for this section:
Keep in mind, this works only if the portion of content and jump link are on the same page.
To link to a different page from the location of the jump link, add the page’s relative URL to the jump link’s a href attribute:
<a href=“page-name#some-heading”>Jump to the H2 Heading</a>
Here the “page-name” portion would be the slug for the desired post/page:
https://asapwp.com/page-name
Images
As previously mentioned, the <img> tag is empty and contains attributes only, without an end tag.
The format for embedding an image is:
<img src=”URL”>
Where URL is the URL to the image you want to insert.
For example:
<img src=”https://asapwp.com/”>
More attributes can be added to the image tag:
Alt attribute
Alt attribute is alternative text you can add to images.
It should describe what the image is.
This helps it to be understood if it cannot be loaded or for the visually impaired using a screen reader.
<img src=”flowers.jpg” alt=“Flowers in a vase”>
Width and Height
<img src=”flowers.jpg” alt=“Flowers in a vase” width=”250″ height=”225″>
Responsive Images
WordPress will naturally scale images within your posts and pages correctly for smaller screen sizes.
But sometimes you might still need to do it manually.
Here the image will scale down to accommodate its container but won’t scale up and stretch beyond its original size.
<img src=”flowers.jpg” style=”max-width:100%;height:auto;”>
Image as Link
To make a clickable image, the <img> tag goes inside the <a> tag:
<a href="URL">
  <img src="flowers.jpg" alt="Flowers in a vase" width="250" height="225">
</a>
Lists
HTML lists let you group related items into lists.
Unordered HTML List
An unordered list starts with the <ul> tag, while each list item starts with the <li> tag.
Each list item will be marked with bullet points (small black circles) by default.
To create an unordered list:
<ul>
  <li>List item 1</li>
  <li>List item 2</li>
  <li>List item 3</li>
<ul>
This list will look like this:
- List item 1
- List item 2
- List item 3
Ordered HTML List
An ordered list starts with the <ol> tag, while each list item starts with the <li> tag.
Each list item will be marked with numbers by default.
<ol>
  <li>List item 1</li>
  <li>List item 2</li>
  <li>List item 3</li>
</ol>
This list will look like this:
- List item 1
- List item 2
- List item 3
Description HTML List
A description list is a list of terms, with a description for each term.
A description list starts with the <dl> tag.
For the terms, use the <dt> tag which defines the term; for the term’s description, use the <dd> tag to describe each term.
For example:
<dl>
  <dt>Apple</dt>
    <dd>Round medium fruit<dd>
  <dt>Watermelon</dt>
    <dd>Oblong large fruit<dd>
</dl>
This list will look like this:
- Apple
- Round medium fruit
- Watermelon
- Oblong large fruit
Tables
There are plugins that allow you to create tables, such as TablePress.
But if you want to manually make your own with HTML, you can do so.
To create a basic table, the format is:
<table>
  <tr>
    <td>Some cell text</td>
  </tr>
</table>
- <table> defines a table
- <tr> defines a row in a table
- <td> defines a cell in a table
So, the previous code above will produce a single row, single cell table.
| Some cell text |
To create a 3×3 table:
<table>
  <tr>
    <td>Cell 1</td>
    <td>Cell 2</td>
    <td>Cell 3</td>
  </tr>
  <tr>
    <td>Cell 4</td>
    <td>Cell 5</td>
    <td>Cell 6</td>
  </tr>
  <tr>
    <td>Cell 7</td>
    <td>Cell 8</td>
    <td>Cell 9</td>
  </tr>
</table>
| Cell 1 | Cell 2 | Cell 3 |
| Cell 4 | Cell 5 | Cell 6 |
| Cell 7 | Cell 8 | Cell 9 |
Scrollboxes
An HTML scrollbox creates scrollbars when the content inside of it exceeds the size of the container.
It’s good for when you have a limited amount of space or simply don’t want a portion of content taking up a lot of space on the webpage.
First, create a <div> container:
<div></div>
Next, add the style attribute to it with the CSS overflow:auto; property:
<div style=”overflow:auto;”></div>
Define the size of the container; when contents inside exceed this container size, it will then start to scroll.
This is done using the CSS height and width property; for example:
<div style=”overflow:auto; height:125px; width:580px;”></div>
Now, add the content:
<div style=”overflow:auto; height:125px; width: 580px;”>This is some content that will exceed the size of the container; once it does, the container will create scrollbars to scroll through the rest of the content. This is some content that will exceed the size of the container; once it does, the container will create scrollbars to scroll through the rest of the content.</div>
Formatting Elements
Bold and Strong Elements
<b> defines bold text.
For example:
<b>This text will be bold</b>
<strong> defines text with strong importance; usually, the text will be bold.
<strong>This text is important</strong>
Italic and Emphasized Elements
<i> defines italic text.
For example:
<i>This text is italic</i>
Will look like:
This text is italic.
<em> defines emphasized text; usually, the text will be italic.
When read aloud by text-to-speech technology, <em> will be read with emphasis.
This text is emphasized.
Mark Element
<mark> defines text to be highlighted
For example:
This <mark>word</mark> should be highlighted.
Will look like:
This word should be highlighted.
Deleted Element
<del> defines text that has been deleted.
You can visually show this since the browser will usually strike a line through the deleted text.
For example:
I like oranges and <del>brussels sprouts</del> candy.
Will look like:
I like oranges and brussels sprouts candy.
Subscript Element
<sub> defines subscript text.
It appears half a character below the normal line, and is sometimes displayed in smaller font.
For example:
It was raining cats and <sub>dogs</sub>
Would look like:
It was raining cats and dogs
You can see subscript text in use with chemical formulas, such as:
You shouldn’t have too much C12H22O11
Superscript Element
<sup> defines superscript text.
It appears half a character above the normal line, and is sometimes displayed in smaller font.
For example:
It was raining cats and <sup>dogs</sup>
Would look like:
It was raining cats and dogs
You can see superscript text in use with footnotes, such as on sites like Wikipedia:
Several etymologies have been presented to explain the phrase “it was raining cats and dogs”.[1]
Quotations
<blockquote> tag is used to quote a section of text.
<blockquote>This text is a blockquote</blockquote>
Which would look like:
This text is a blockquote
<q> tag is used to quote a smaller portion of text, and will usually have quotations inserted around it.
<q>This text is a short quote</q>
This text is a short quote
Abbreviations
You can abbreviate or create an acronym that will show the full term on mouse hover.
For example:
<abbr title=”As Soon as Possible”>ASAP</abbr> originated as U.S. Army slang in the 1950s.
ASAP originated as U.S. Army slang in the 1950s.
Conclusion
Learning HTML will help you with your WordPress website.
You’ll be able to craft more engaging and dynamic content, add your own HTML elements, and make changes to existing HTML code.
This is how you can make your site stand out from the rest and become more of what you want it to be.
While this WordPress HTML guide hasn’t covered everything there is to know about HTML, hopefully it has helped you with the basics.
