On a WooCommerce site I was working on, I needed to split the cart contents based on the items added to cart.
The reason for this was because certain items were being shipped from different locations, requiring the customer to select more than one shipping method at a time per order.
For example, if the customer added “Product A” (which shipped from “Warehouse A”) and “Product B” (which shipped from “Warehouse B”), they needed to choose separate shipping methods for both warehouses.
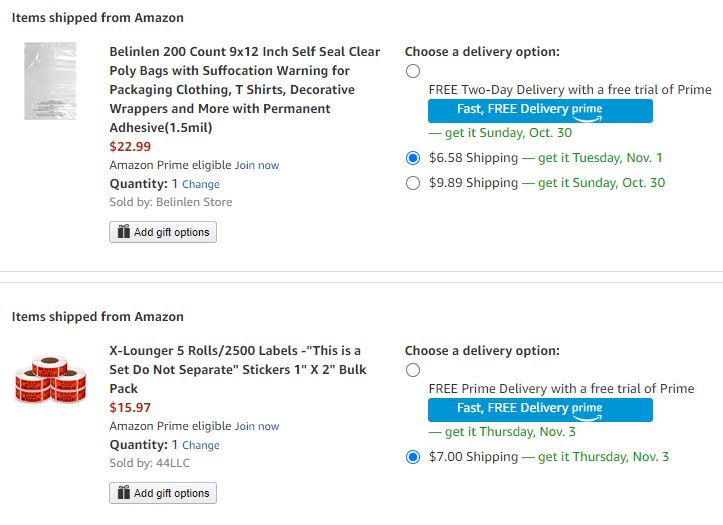
Amazon does something like this when ordering from different sellers/warehouses, having separate shipping methods based on the cart items:
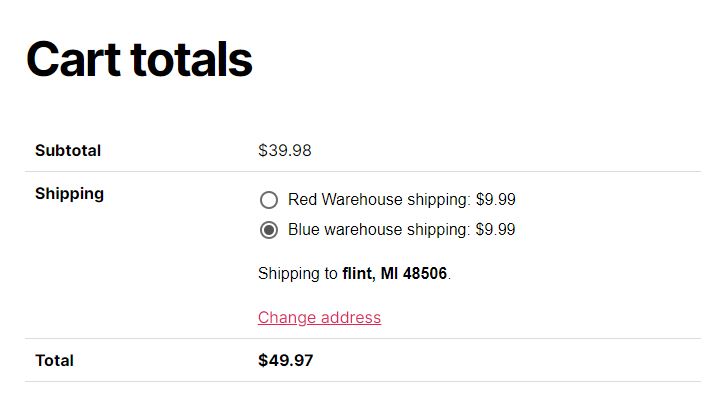
Unfortunately, by default, WooCommerce only allows you to select one shipping method at a time per order, regardless of what items are in the customer’s cart.
Here’s a way to get around that:
Advanced Shipping Packages
WooCommerce Advanced Shipping Packages is a plugin that allows you to split cart contents into separate shipping packages.
These shipping packages are triggered on conditions that you set, such as when a specific product is in cart, belonging to a certain product category, contains a shipping class, etc.
Once products are divided in cart into separate shipping packages, they can then be configured to have their own unique shipping methods (just like Amazon).
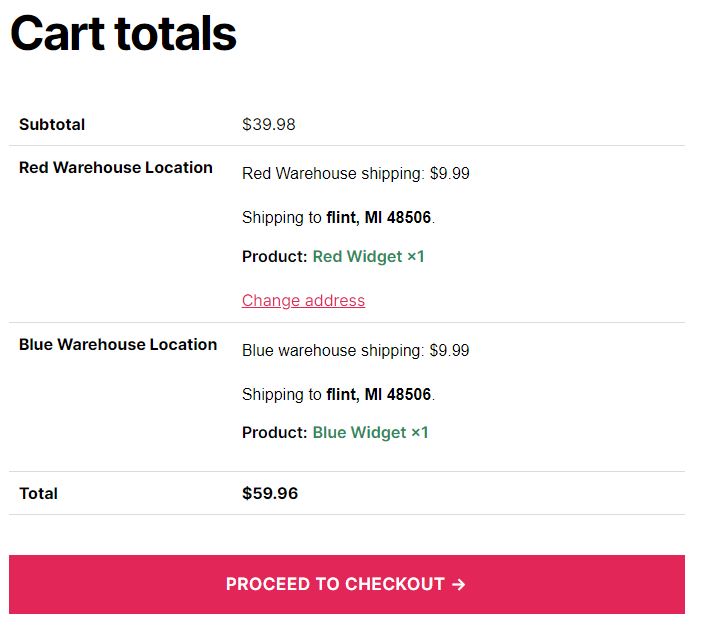
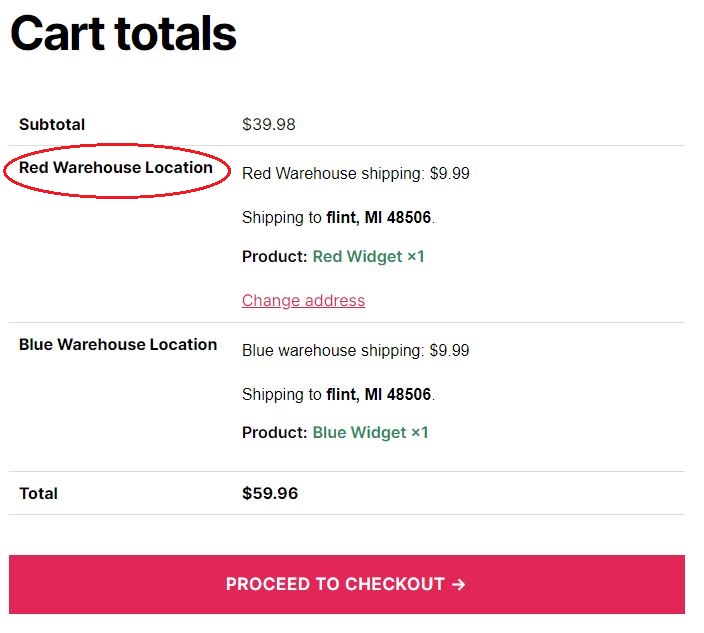
For the image above, conditions are set that when “Red Widget” is in the customer’s cart, it will put it into the “Red Warehouse” package, with its own shipping method: “Red Warehouse Shipping”.
And when “Blue Widget” is in the customer’s cart, it will fall into the default shipping package I’ve named “Blue Warehouse”, with its own shipping method: “Blue Warehouse Shipping”.
This conveys to the customer that certain products will be shipped with their own shipping methods from different warehouses/locations.
Use Cases for this Plugin
Obviously, this plugin is a great option if you’re looking to ship products from different locations/warehouses and need to show different shipping methods.
This could include:
- If you have two or more warehouses that you ship your products from
- If you’re running a marketplace, where sellers are shipping products from different locations
- If you have a drop shipping business, where you’re shipping domestically for some products and drop shipping from China for others
I’ve used this plugin on a drop shipping store that was transitioning from drop shipping to having actual stock on hand.
Certain products, where stock was on hand, would ship domestically, shown to the customer with a faster shipping method.
Other products still being sourced from China, when purchased in conjunction with the prior stock on hand products, would split the cart and be put into own shipping package, shown to the customer with an additional slower shipping method.
This way, the customer could clearly see that items will be shipped separately and with different shipping speeds.
Configuring Advanced Shipping Packages
Step 1: Download and Install Advanced Shipping Packages
The first step is to download the plugin and install it on your website.
Once you’ve done that, head to the admin side panel and go to WooCommerce->Settings and then to “Shipping” tab.
Click the “Packages” navigation link and make sure “Enable Advanced Shipping Packages” is checked.
There is also an empty field labelled “Default package names”.
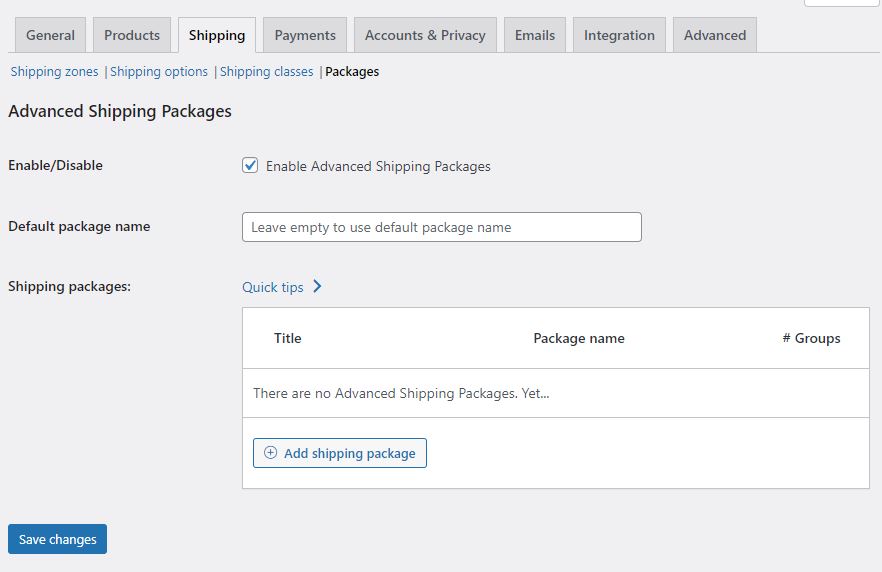
Here you can enter the name for the default shipping package; in cart, this is where all items that aren’t triggered to go into specific shipping packages will go.
Left blank, it will default to the label “Shipping”.
Step 2: Create Shipping Packages and Set Conditions
On the same page, press the “Add shipping package” button to create a new package.
Here you can create and define the conditions for shipping packages.
Under “Shipping Package conditions” you can define the conditions that will cause the cart content to split into separate packages.
There are a lot of triggers you can choose from, such as when:
- A particular product is in cart
- A product contains a certain shipping class
- A defined subtotal is met
- A specific coupon is used
And many others:
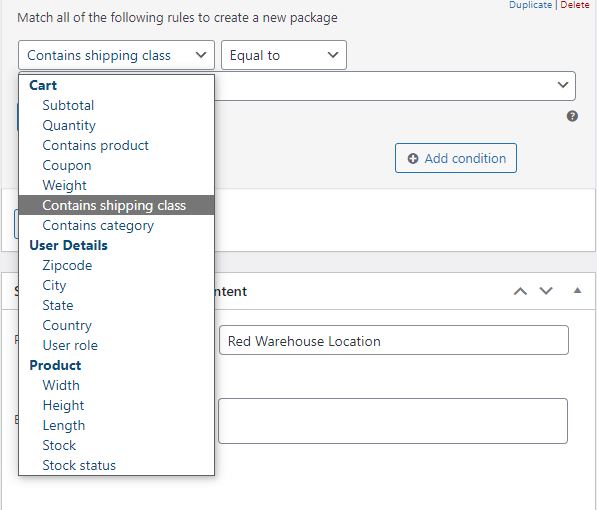 Once you’ve chosen your preferred condition to split the cart into an additional package, you can proceed to the next setting “Shipping Package settings & content”.
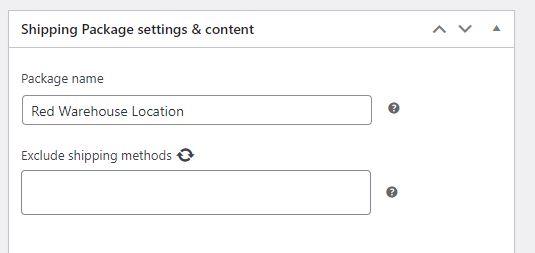
The first field is “Package Name”; the name you choose here will be shown to the customer as the package name.
The “Exclude shipping method(s)” selection box allows you to exclude shipping methods you already have on your store from being available to that shipping package.
For example, you might only want a certain shipping method to be available for that package.
The next option is “Products that match all of the following rules will be added to the package”.
Similar to the conditions you previously set to split the cart content into a new package, here you will set conditions for which products should go into that new package.
Like the previous set of conditions, there are quite a few to select from here as well.
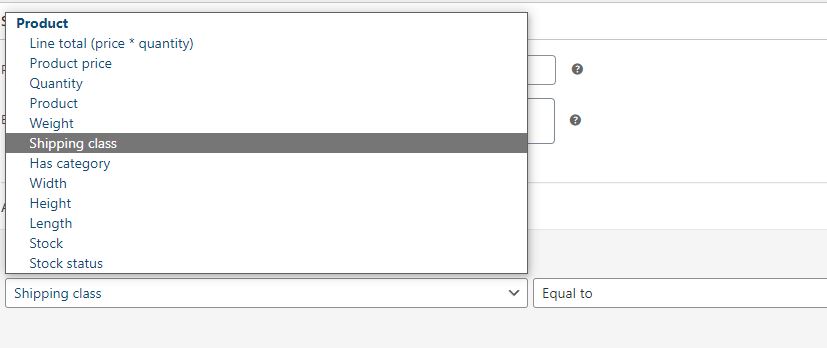
Once you’ve set that, you can press the “Update” button and the package along with its conditions will be created when triggered in cart.
An Example of How to Set Up Advanced Shipping Packages
In my demo store, I have products that will ship from two different warehouses: “Red Warehouse” and “Blue Warehouse”.
All “Red Widgets” will be shipped from “Red Warehouse” and all “Blue Widgets” will be shipped from “Blue Warehouse”.
To start, I created a shipping class in WooCommerce called “Red Warehouse” and assigned all “Red Widget” products to that shipping class.
I then used that shipping class as a condition in Advanced Shipping packages, in order to trigger the creation of a new package.
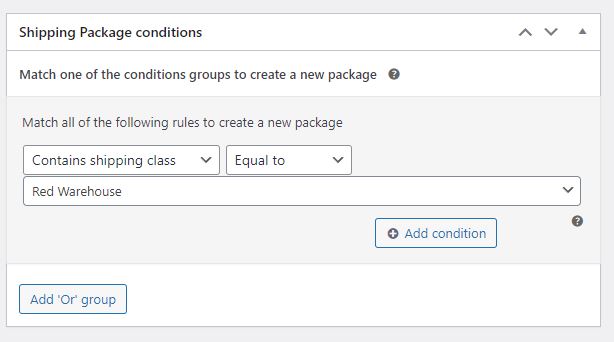
Next, I named the package “Red Warehouse Location”, which is what the customer will see.
I then set a condition for products equal to shipping class “Red Warehouse” (which I’ve assigned to all the “Red Widgets”) to be added to the new package.
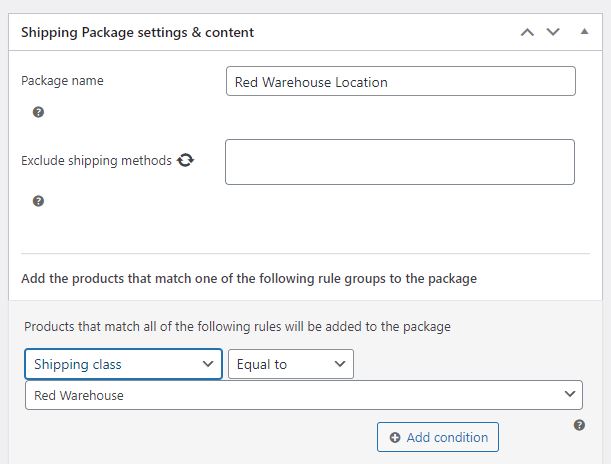
Now whenever a customer adds a product that is assigned to the shipping class “Red Warehouse” to cart, it will split the cart, create the “Red Warehouse Location” package, and put all “Red Widgets” into that package.
And everything that is not “Red Widgets” (therefore not assigned the shipping class “Red Warehouse”) will be left as is in the default package.
The result looks like this:
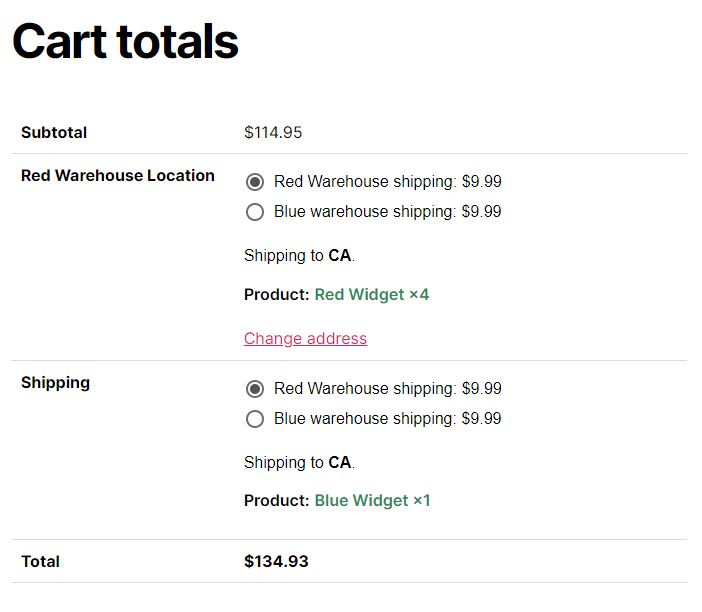
As you can see, the 4x Red Widgets are being placed in the created “Red Warehouse Location” package.
And the “Blue Widgets”, not matching any of our set conditions, are defaulting to the default (“Shipping”) package.
Okay, but there are still two problems in this image for me:
The first is that the default package, where all non-Red Widgets are going (which in this case are the Blue Widgets) is labelled “Shipping”.
Instead, I want the default package to be labelled as “Blue Warehouse Location”.
To do this, go to admin side panel WooCommerce->Shipping and then Packages, and change the default package name.

That looks better:
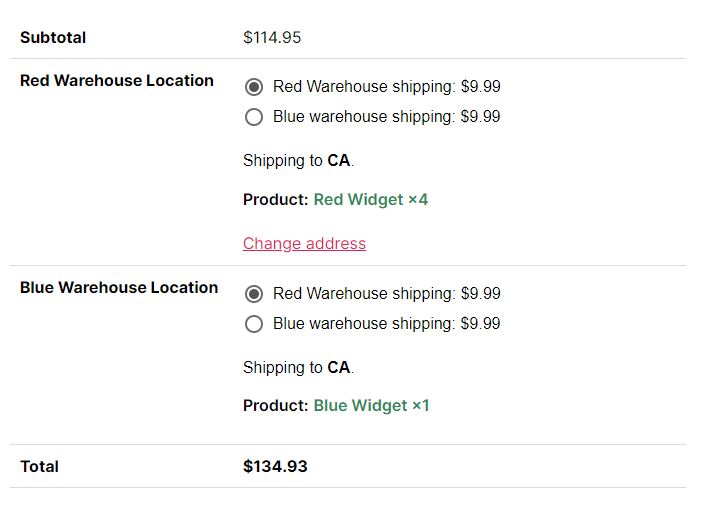
However, the second issue still remains:
I had previously created two shipping methods in WooCommerce: “Red Warehouse shipping” and “Blue Warehouse shipping”, and now both are being applied to each package.
Instead, I want only “Red Warehouse shipping” method to be shown for the “Red Warehouse Location” package and only “Blue Warehouse shipping” method for the “Blue Warehouse Location” package.
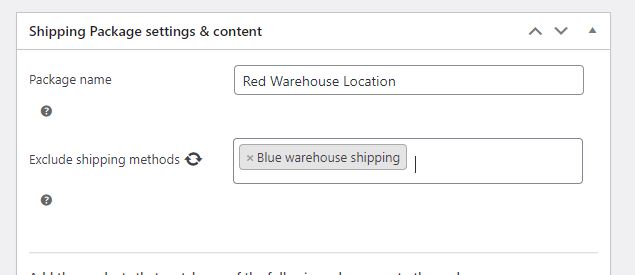
In the Advanced Shipping Packages settings, when creating a new package, it does allow you to exclude a shipping method from a package.
Here we can exclude the “Blue Warehouse shipping” method from the “Red Warehouse location” package I previously created.
Although the plugin does not allow you to exclude a shipping method from the default package.
The only changes you can even make to the default package is changing the name of it.
So, in this case, the default package/”Blue Warehouse location” package will still have both shipping options available, which I don’t want.
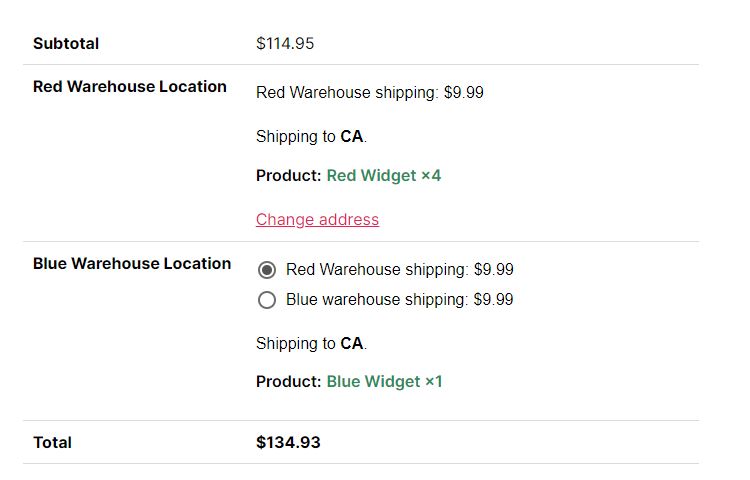
The way to get around this is to set a condition on the actual shipping method itself.
If you already have a plugin that allows for conditions on WooCommerce shipping methods, you can use that.
For this demonstration, I will be using the free plugin Fish and Ships for this purpose.
Once installed and activated, head to WooCommerce->Shipping and then “Shipping Zones”.
Next, create a new shipping method and choose “Fish and Ships” from the dropdown options.
Give the shipping method a title; in my case, I’m re-creating the “Red Warehouse shipping” method with Fish and Ships.
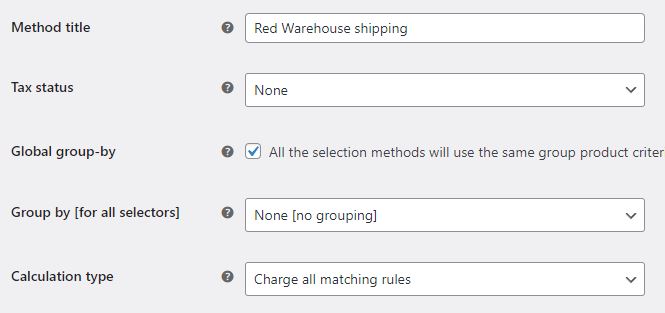
For conditions, I simply configured it so that “Red Warehouse shipping” will only be available to a customer if “Blue Warehouse” shipping class does not exist/is not assigned for that product.
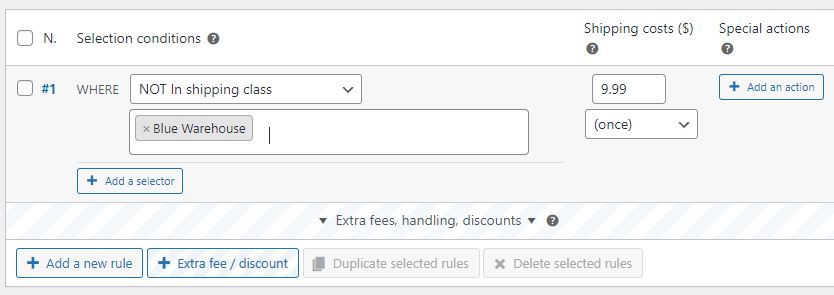
Once saving the shipping method, I have achieved the desired result:
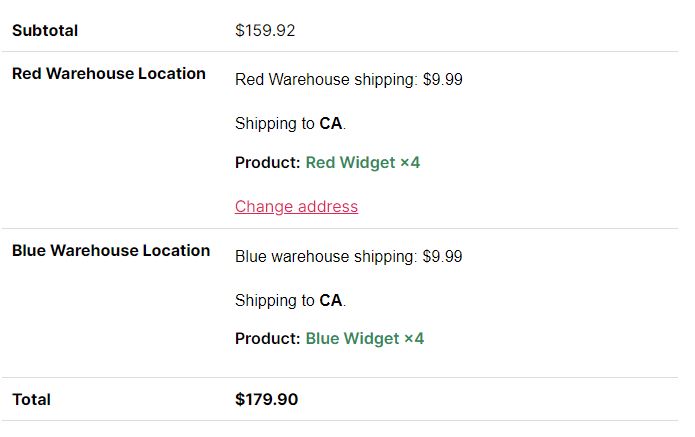
Now only “Red Warehouse shipping” will be available for “Red Warehouse Location” package, since we excluded “Blue Warehouse Location” shipping from the package settings.
And only “Blue Warehouse shipping” will be available for “Blue Warehouse Location”, since “Red Warehouse shipping” will only be available if a product does not contain the “Blue Warehouse” shipping class, via Fish and Ships conditional settings.
Conclusion
Splitting cart contents with separate shipping methods for different products within a single order is possible in WooCommerce.
It can easily be accomplished with the Advanced Shipping Packages plugin along with a conditional shipping method.
